How To Create Sticky Note App in HTML CSS & JavaScript | Mini Text Editor

Code Hunter Sharath 🚀
I’m a Full Stack Developer with 9+ years of real-world experience (since 2015). On this channel, I help you learn by building — not just tutorials, but practical projects that actually matter.
You’ll find step-by-step content on JavaScript, React, Next.js, Angular, Node.js, and full-stack application development. From beginner fundamentals to advanced real-world projects, everything here is designed to help you think like a developer.
💡 This channel is for you if you want to: • Build real-world projects • Strengthen your problem-solving skills • Create a portfolio recruiters care about • Grow from beginner to job-ready developer
I strongly believe anyone can learn to code — with consistency, patience, and hands-on practice. Programming becomes simple when you stop watching and start building.
👉 Subscribe and start your journey with real projects, real skills, and real growth.
#Week 02 of 52 Weeks in JavaScript Projects
Overview:
Welcome to our JavaScript Sticky Note App with Mini Text Editor Coding Tutorials.
In this article, we'll walk you through a step-by-step guide to building a fully functional and dynamic digital sticky note application with a mini text editor from scratch using HTML CSS and of course JavaScript.
You'll learn how to implement essential sticky notes that you can use to organize your thoughts. This will have functionalities like reading data from local storage, adding notes, editing existing notes, auto-updating, and removing virtual sticky notes on the screen.
✅ Watch Live Preview 👉👉 Mini Text Editor
Throughout this video, we'll cover key concepts such as DOM manipulation, event handling, and local storage integration, enabling you to build a fun and practical digital version of those classic sticky notes with the mini text editor we all love.
By the end of this video, you'll have a powerful Mini Text Editor Note App. This mini-note app can change the selected text to capitalize, bold, italic, underline, and line-through effortlessly through the browser.
Important Note:
In the Sticky Note App tutorial, we have stored our data list in local storage. The localStorage object allows you to save key/value pairs in the browser. The data is not deleted when the browser is closed/refreshed and is available for future sessions.
Let's get started on creating your own JavaScript-mini text editor note app now! HAPPY CODING!
You might like this:
Introduction:
Sticky notes are a timeless solution for quick reminders and notes. Ever thought about creating your own digital sticky note app? Get ready to bring your virtual sticky notes to life with this fun and practical mini-text editor project. This mini text editor will not only be a practical addition to your toolkit but also a fun and rewarding coding project. This mini project is perfect for beginners and offers a delightful way to enhance your web development skills.
Prerequisites:
Basic knowledge of HTML, CSS, and JavaScript.
A code editor of your choice.
Steps to Build Your Sticky Note App:
Step 1: Set Up Your Project:
Create a new folder for your project, project name as per your wish I have created a project name called Note App. and inside it, create three files: index.html, style.css, and script.js with an image folder and supported images. These files will serve as the foundation for your Note App. if you want to clone my Project-Structure-Example and start working with me.
Step 2: Build the HTML Structure:
In the index.html file, create the HTML structure for your note app. and add the HTML Boilerplate by linking these files (style.css, script.js) into an HTML file.
The <link> tag defines the relationship between the current document and an external resource. (style.css)
The <script> tag is used to embed a client-side script (JavaScript). or it points to an external script file through the src attribute. (script.js)
<!DOCTYPE html>
<html lang="en">
  <head>
    <meta charset="UTF-8" />
    <meta name="viewport" content="width=device-width, initial-scale=1.0" />
    <title>Note App - By Sharathchandar.K</title>
    <link rel="stylesheet" href="style.css" />
  </head>
  <body>
    <!-- Container here -->
    <script type="text/javascript" src="script.js" ></script>
  </body>
</html>
First, will add the div with class and id as a container inside the body element. The div tag defines a division or a section in an HTML document.
<div class="container" id="container">
<!-- Inside the container will add an input field for adding tasks, a list to display the tasks, and buttons for adding and removing tasks.-->
</div>
Step 3: Style Your App with CSS:
In the style.css file, and add CSS rules to make your app visually appealing.
We are setting all elements to have zero margins, and zero padding, thus making them look the same in all browsers. with the help of * and my favorite font family Poppins. and then will set the background color to the entire body and will set all the notes in the view of row for that will add the styles to the .container with the help of display with supported properties.
@import url("https://fonts.googleapis.com/css2?family=Poppins:wght@400;500;600&display=swap");
* {
  margin: 0;
  padding: 0;
  font-family: "Poppins", sans-serif;
  box-sizing: border-box;
}

body {
  background: #78c1f3;
  padding: 25px;
}

.container {
  display: flex;
  flex-wrap: wrap;
  flex-direction: row;
}
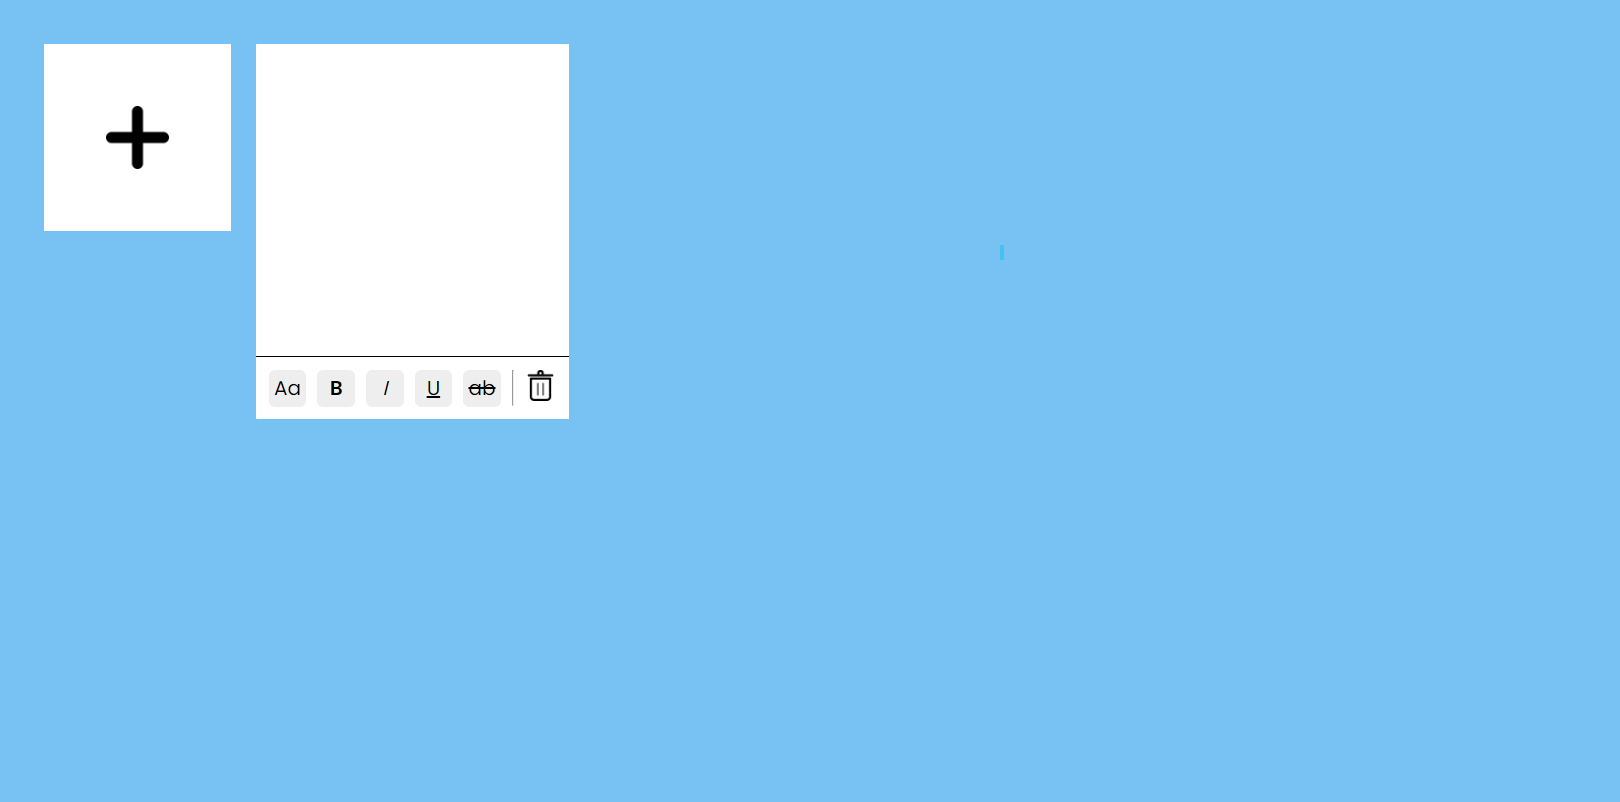
this is what our Note App looks like after adding the above code.

Step 4: Implement the Image Button to add Notes:
Now will add the image tag inside the container, to display the add event button to the user. and will set the onclick event called CreateNewNote() and class attribute with the value of addNote.
<img src="images/plus.png" onclick="CreateNewNote('')" class="addNote" />

this is how the image looks like, and then now will add the styles to the image.
.addNote {
  height: 150px;
  background: #ffffff;
  cursor: pointer;
  margin: 10px;
  padding: 50px;
}

Step 5: Implement the JavaScript Functionality:
In the script.js file, and write JavaScript code to make your app interactive. Create Declarations and functions for adding functionality for notes. You can use the Document Object Model (DOM) to manipulate elements in your HTML.
First will declare all the declarations with the help of a document object, the document object represents the owner of all other objects on your web page.
const Container = document.getElementById("container");
let selectedText = "";
let rangeAT = "";
Next will declare the localstorage object into the let noteData with the help of key:noteData with this declaration, will read the JSON.parse data from localstorage with the help of getItem() else will initialize the empty array [] into this.
let noteData = JSON.parse(localStorage.getItem("noteData")) || [];
Next will add the functions for each functionality like CREATE, READ, SAVE and DELETE. The function is a block of code designed to perform a particular task. A JavaScript function is executed when "something" invokes it (calls it).
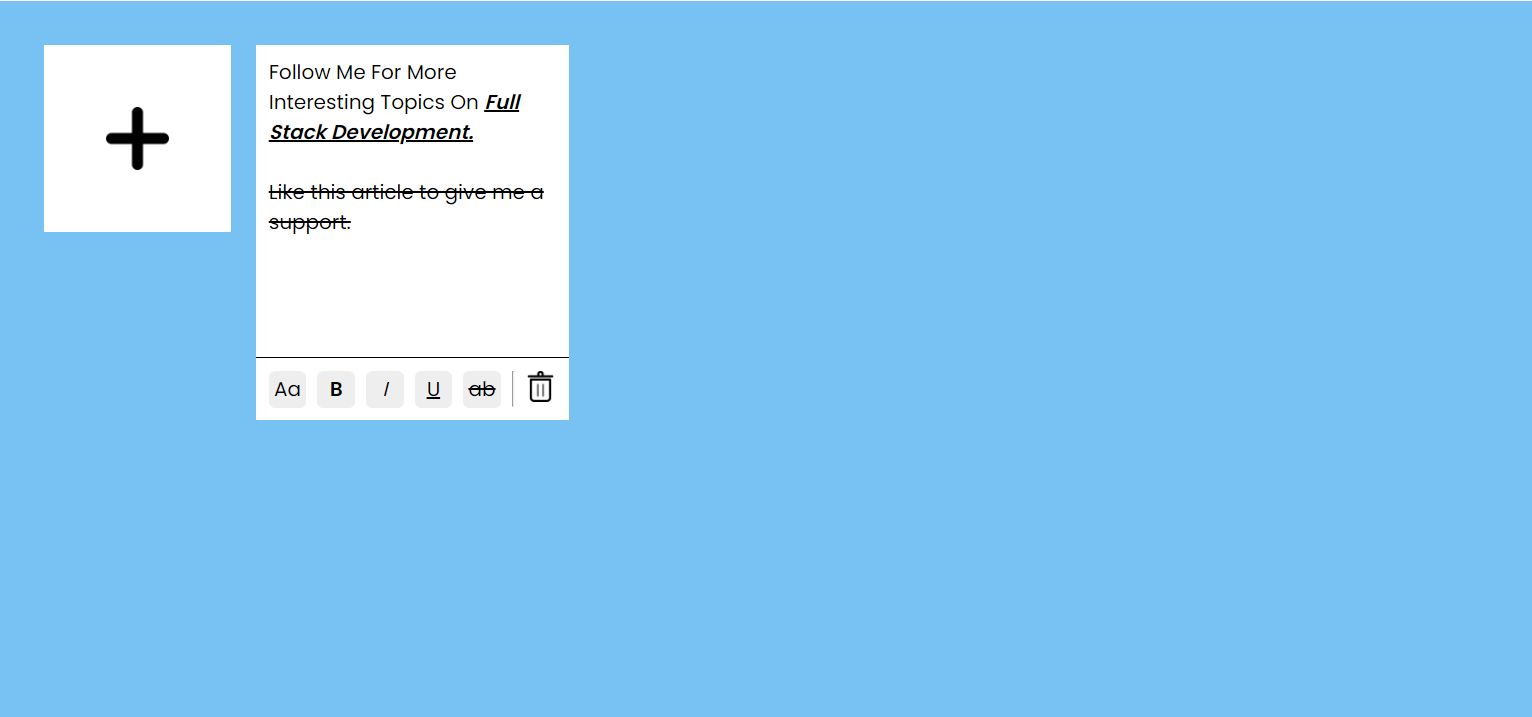
This below function will help to create a new note area to add note text and change the styling of the text characters into the list with some additional features:
in this CreateNewNote() function we will create a dynamic note area with HTML from the script.
this function will create a note area with styling options to enable text as capitalize, bold, italic, underline & lineThrough.
in the note area, we have the option to delete the note from the view as well as localstorage too.
While clicking this CreateNewNote() event from the + img event our tool will save the current session notes into the localstorage.
function CreateNewNote(e) {
  let div = document.createElement("div");
  div.classList.add("note-row");
  let newHTML =
    `<div contenteditable="true" class="note-editor" id="note-editor" onmouseup="getSelectedText()">` +
    e +
    `</div>
        <div class="note-controls">
        <div onclick="getSelected('capitalize')" class="capitalize">Aa</div>
        <div onclick="getSelected('bold')" class="bold">B</div>
        <div onclick="getSelected('italic')" class="italic">I</div>
        <div onclick="getSelected('underline')" class="underline">U</div>
        <div onclick="getSelected('lineThrough')" class="lineThrough">ab</div>
        <hr />
        <img src="images/delete.png" onclick="DeleteNote(this)" />
        </div>`;
  div.innerHTML = newHTML;
  Container.appendChild(div);

  const noteEditor = document.querySelectorAll(".note-editor");
  noteEditor.forEach((el) =>
    el.addEventListener("keypress", (e) => {
      if (e.key === "Enter") {
        document.execCommand("insertHTML", false, "<br/>");
        return false;
      }
    })
  );
  SaveNoteData();
}
and then will add the styling for the Note area added through this above function.
.note-row {
  background: #ffffff;
  margin: 10px;
}

.note-editor {
  height: 250px;
  width: 250px;
  resize: none;
  border: none;
  outline: none;
  padding: 10px;
  border-radius: 10px;
  overflow: auto;
}

.note-editor::-webkit-scrollbar {
  display: none;
}

.note-controls {
  height: 50px;
  width: 250px;
  padding: 10px;
  display: flex;
  justify-content: space-between;
  border-top: 1px solid;
}

.note-controls div {
  width: 30px;
  height: 30px;
  cursor: pointer;
  text-align: center;
  background: #eeeeee;
  border-radius: 5px;
  line-height: 30px;
}

.note-controls img {
  height: 25px;
  cursor: pointer;
}

.bold {
  font-weight: bold;
}

.capitalize {
  text-transform: capitalize;
}

.italic {
  font-style: italic;
}

.underline {
  text-decoration: underline;
}

.lineThrough {
  text-decoration: line-through;
}
once will add the above styles into the style.css and hit the + event calls in the browser window, our note app will create a new note area with the supported styling event that looks like the mini-text editor to style the text into the note area and based on the users clicks on + event calls tool will automatically creates new note area every time.
this below function will help us to SAVE the note details with user-added styling into the localstorage. when the user clicks + event or will add the addEventListener for key-down to save the notes with the help of Ctrl + s from the browser window.
once the user clicks Ctrl+s on the browser, our note tool will save all the details with what the styles added for the text into the localstorage.
document.addEventListener('keydown', e => {
    if (e.ctrlKey && e.key === 's') {
        e.preventDefault();
        SaveNoteData();
    }
});

function SaveNoteData() {
  noteData = [];
  localStorage.setItem("noteData", []);
  const noteEditor = document.querySelectorAll(".note-editor");
  noteEditor.forEach((el) => {
    if (el.innerHTML !== "") {
      let HTML = { value: el.innerHTML };
      noteData.push(HTML);
    }
  });

  localStorage.setItem("noteData", JSON.stringify(noteData));
}
This below function helps us to READ notes data from localstorage and display it in the view in the same as the user saves with and without styling by onload the app.
readData();
function readData() {
  noteData.forEach((element) => {
    CreateNewNote(element.value + "<br />");
  });
}
The below two function was initiated on the create note function based on the user click and change this function will invoke and do the below process.
this getSelectedText() function will help us to get the selected text from the window to set the styling from the range on the window selection.
this getSelected() function will help to add the span element with selected styles from the user clicks on the style area like capitalize, bold, italic, underline & lineThrough. based on this selection tool will add that style into that element and insert it back into the div as innerHTML and the rest of the things styles will taken care of.
function getSelectedText() {
  selectedText = window.getSelection().toString();
  rangeAT = window.getSelection().getRangeAt(0);
}

function getSelected(style) {
  if (selectedText) {
    let div = document.createElement("span");
    div.classList.add(style);
    div.innerHTML = selectedText;
    rangeAT.deleteContents();
    rangeAT.insertNode(div);
  }
}
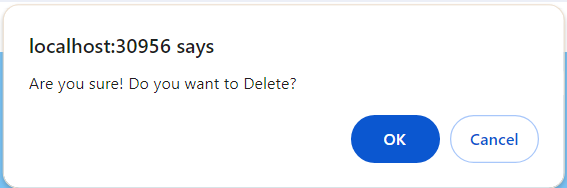
This below function helps to DELETE a note area data from the view as well as localstorage.
If the user clicks the 🗑️ Delete icon in the style area tool will show a confirm alert message "Are you sure! Do you want to Delete?".
If the user says OK on the confirm window tool will automatically delete the note area and data from the view as well as
localstorage.If the user says cancel nothing will change in the view. this confirmation message shows user awareness for clicking the correct event.
function DeleteNote(e) {
  let conform = confirm("Are you sure! Do you want to Delete?");
  if (conform) {
    e.parentElement.parentElement.remove();
    SaveNoteData();
  }
}
Step 6: Test and Customize:
Open your index.html file in a web browser to test your Mini Text Editor Note app. Add Text and Change the styling for that, remove them or change them with different styling and Delete the notes to ensure everything works as expected. You can further customize and enhance your app by adding features like adding more styling event, added dates, or data persistence using local storage.
Conclusion:
Congratulations! You've successfully created your very own Sticky Note App a personalized mini text editor at your fingertips using HTML, CSS, and JavaScript. This mini-project not only provides a practical tool for quick note-taking but also serves as an excellent learning experience for budding developers. Feel free to customize and expand upon this project as you continue to explore the vast world of web development. Happy coding!
Join our ever-growing community on YouTube, where we explore Full Stack development, learn, and have fun together. Your subscription is a vote of confidence, and it enables us to keep producing high-quality, informative videos that you can enjoy and share with your friends and family.
So, if you haven’t already, please hit that subscribe button, click the notification bell, and be a part of our YouTube family. Let’s continue learning, growing, and sharing knowledge in exciting and innovative ways.
Thank you once again for your support, and we look forward to seeing you on our YouTube channel!


